Do I need to buy new hardware?
No. FrontDesk runs on any iPad or Android tablet you already own. The kiosk app is a free download from the App Store or Google Play. The QR check-in needs nothing but a printed code at your desk.
Some offices like a fixed iPad on the desk. Others prefer a printed QR code clients scan with their own phone. FrontDesk gives you both — and behind either one you'll find the same notifications, the same admin controls, and the same branding. You set it up once.
A branded, self-service check-in screen that runs all day on any iPad you already own. Clients tap. Providers get notified. Reset happens automatically.
No iPad? No problem. Print a unique code per location, post it at the front desk, and clients check in from their own phone.
The iPad Kiosk
Step 1 — Arrival
The kiosk greets every client with your colors, your logo, and your wording. No generic iPad screen. No app store branding. Just yours.
Please check in to see your provider.
Select your provider to check in


Don't see your provider? Please notify staff.
Confirm you are here to see
Take a seat in the lobby and your provider will be with you shortly.
Step 2 — Selection
A clean grid of every provider working at that location. Clients tap the name they came to see. If you renamed "providers" to "therapists" or "stylists" — it shows up that way here.
Please check in to see your provider.
Select your provider to check in
Don't see your provider? Please notify staff.
Confirm you are here to see
Take a seat in the lobby and your provider will be with you shortly.
Step 3 — Confirmation
Clients confirm their selection and the kiosk fires off the notification. No forms, no signatures, no email collection. The fewer steps, the more reliably it gets used.
Please check in to see your provider.
Select your provider to check in
Don't see your provider? Please notify staff.
Confirm you are here to see
Take a seat in the lobby and your provider will be with you shortly.
Step 4 — Closure
The kiosk acknowledges them, then resets for the next client. The whole interaction is under ten seconds — and your provider already knows they’ve arrived.
Please check in to see your provider.
Select your provider to check in
Don't see your provider? Please notify staff.
Confirm you are here to see
Take a seat in the lobby and your provider will be with you shortly.
The iPad Kiosk
Please check in to see your provider.
Select your provider to check in
Don't see your provider? Please notify staff.
Confirm you are here to see
Take a seat in the lobby and your provider will be with you shortly.
Step 1 — Arrival
The kiosk greets every client with your colors, your logo, and your wording. No generic iPad screen. No app store branding. Just yours.
Step 2 — Selection
A clean grid of every provider working at that location. Clients tap the name they came to see. If you renamed "providers" to "therapists" or "stylists" — it shows up that way here.
Step 3 — Confirmation
Clients confirm their selection and the kiosk fires off the notification. No forms, no signatures, no email collection. The fewer steps, the more reliably it gets used.
Step 4 — Closure
The kiosk acknowledges them, then resets for the next client. The whole interaction is under ten seconds — and your provider already knows they’ve arrived.
QR Check-In
Setup — once
Generate a unique QR for every location from your admin portal. Print a free-standing sign, frame it next to the door, tape it to your reception desk — whatever fits your space. One sign, no hardware.
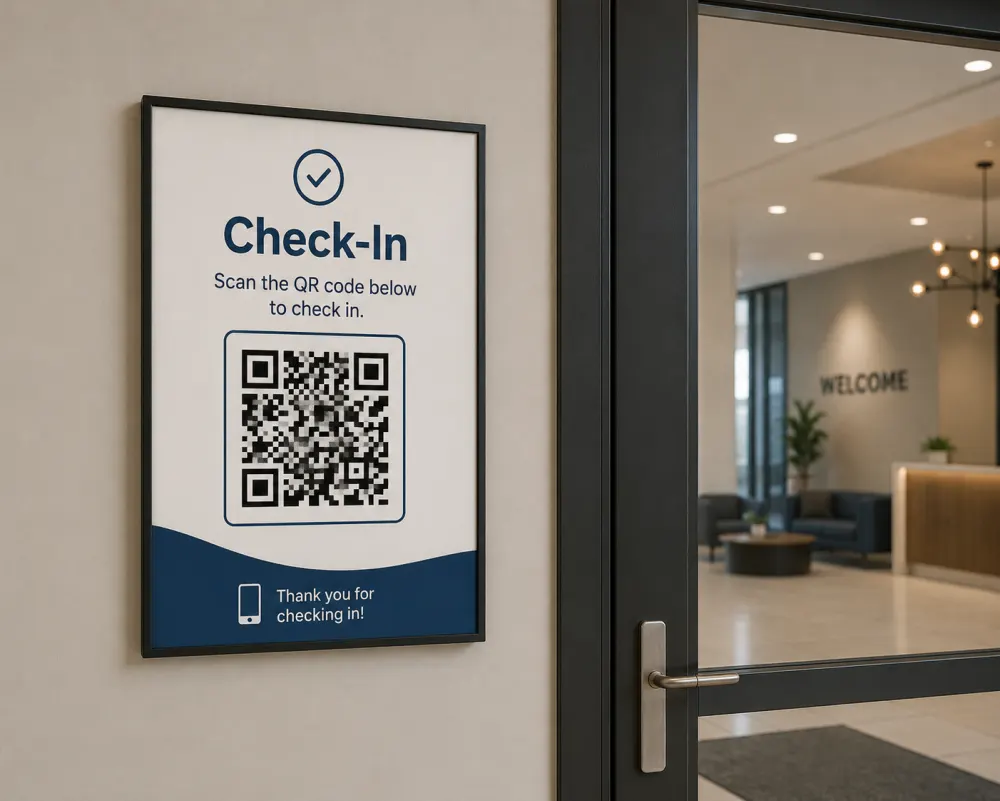
Step 1 — Arrival
No app to download. No login. Their phone camera recognizes the QR and opens your branded check-in page — same look as the iPad kiosk, just in their hand.
Step 2 — Selection
The list of providers at this location, ready to tap. We use a short-lived session token so the QR never leaks data and can’t be replayed once they’re done.
Step 3 — Notification
Same notification, same speed. Whether the client checked in on your iPad or their phone, the provider sees one alert — your team doesn’t care which path got used.
Step 4 — All set
The client sees a calm thank-you screen. Your provider gets the notification. Everyone knows where they stand — without anyone needing to be at the desk to make it happen.
QR Check-In
Setup — once
Generate a unique QR for every location from your admin portal. Print a free-standing sign, frame it next to the door, tape it to your reception desk — whatever fits your space. One sign, no hardware.
Step 1 — Arrival
No app to download. No login. Their phone camera recognizes the QR and opens your branded check-in page — same look as the iPad kiosk, just in their hand.
Step 2 — Selection
The list of providers at this location, ready to tap. We use a short-lived session token so the QR never leaks data and can’t be replayed once they’re done.
Step 3 — Notification
Same notification, same speed. Whether the client checked in on your iPad or their phone, the provider sees one alert — your team doesn’t care which path got used.
Step 4 — All set
The client sees a calm thank-you screen. Your provider gets the notification. Everyone knows where they stand — without anyone needing to be at the desk to make it happen.
Meanwhile, on the provider's phone
It doesn’t matter whether the client checked in on your iPad or scanned the QR code with their phone — your provider sees the same alert, on the same staff app, in real time.
Wednesday, May 28
9:41
Behind the scenes
Branding, locations, providers, QR codes, billing — every control in one friendly dashboard you open from any browser. No extra apps. No spreadsheets.
Make the check-in screen feel like your practice — your colors, your logo, the whole look. Watch it update live, then send it to your iPad whenever you're ready.
Try the Branding StudioEveryone on your team gets the free FrontDesk app, so they know the moment their client walks in. Works on iPhone and Android.
The fine print, plainly
No. FrontDesk runs on any iPad or Android tablet you already own. The kiosk app is a free download from the App Store or Google Play. The QR check-in needs nothing but a printed code at your desk.
That’s exactly the moment FrontDesk was built for. Clients check themselves in. Your provider gets notified on their phone. No one has to be at the desk for the front door to work.
Yes. Each QR maps to a short-lived session token signed server-side. Codes can be rotated instantly from your dashboard if a printout ever leaves your space. The check-in payload never contains client PHI.
Every location gets its own kiosk and its own QR code. Providers can be assigned to one or many locations. Billing is per-provider, not per-location — so adding a clinic is cheap.
Yes — for free. The Branding Studio lets any admin redesign the entire arrival screen in seconds: custom gradients, button colors, your logo. Preview live before pushing to your iPad.
Push notification to the FrontDesk staff app on iOS or Android. It arrives within a second of the client confirming. Providers can acknowledge from the notification or open the app for the full arrival feed.
Set up your iPad kiosk and QR check-in in under fifteen minutes. Try the whole platform free for thirty days.